Let's Test Your Loudspeakers
I asked in a recent post “When was the last time that you listened analytically to your loudspeakers? I mean, really, truly listened to them?”
The fact is that you don’t need to have access to any cool test gear for this process. You can test and evaluate their performance with your ears, with the help of some test signals. So let’s take a few minutes and methodically test each of your loudspeakers. You might be surprised at what you hear.
For starters, investigate how your loudspeaker system is wired. What we want to know is if we can turn on just one loudspeaker at a time. What that means of course is that each loudspeaker will have its own amplifier channel, and possibly its own DSP channel.
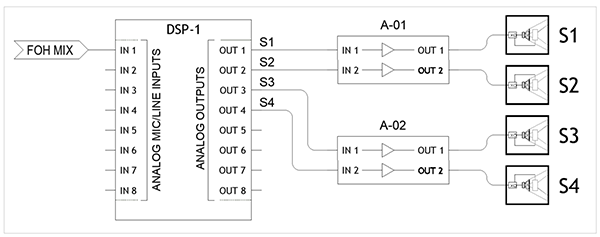
Hopefully you have access to the signal flow diagram (aka, block diagram) showing how your system is wired. If not, see if the power amps are labeled showing which speaker is driven by which power amp channel.

Let’s say that your system has four main loudspeakers. I would label those “S1” through “S4”. And let’s say that there are two power amps in the rack with labels showing that channel 1 of Amp #1 is driving S1, and channel 2 of Amp #1 is driving S2. And (hopefully) on Amp #2, channel 1 feeds S3 and channel 2 feeds S4.
What that means is that we have separate control over each of those four main loudspeakers. For example, we could listen to just S1 by turning off amp #2 and turning down the level control on channel 2 of amp #1. Why listen to just one loudspeaker at a time? Because it’s really tough to hear any issues with a particular loudspeaker if you’re also hearing additional loudspeakers.
Side Note: One of my (very few) pet peeves is the common practice of some integrators who wire up two or more loudspeakers to the same amp channel, or the same DSP channel. They do that to save money, but it’s next to impossible to tune a system like that once it’s flown overhead, especially if the loudspeakers have overlapping coverage of adjacent seating areas.
Time to Do Some Analytical Listening Tests
Now, there are a few listening tests we can do. I’ve provided a link to download some MP3 files for your use in this experiment. Click on the three dots to the right to download each of the following files and play those files over your loudspeaker system. (Start at a low volume to avoid speaker damage.)
CSC_test_pink‐noise_6kHz
Great for confirming that the HF drivers are working and checking pattern coverage.
CSC_test_pink‐noise
Full range pink noise for testing all of the loudspeakers.
Shirk_impulse‐mono
Super-fast, full-range swept sine wave. Great for studying echoes from the system.
CSC_sine_100Hz
Let’s you confirm that the low end of your mains are working well.
CSC_sine_50Hz
Let’s you confirm that the subwoofers are working, and to listen for room modes.
Note: those are all MP3 files (a limitation of the platform we're using for these posts). If you would like them as WAV files, just send your request to me at [email protected].
Start by playing the file labeled "6 kHz band‐limited pink noise". It is just as its name implies – pink noise filtered with an equalizer to provide just the 1/3‐octave centered at 6 kHz.
Why? Because that ensures that we will be hearing the sound energy only from the high frequency horn on each of our loudspeakers. It’s a quick way to confirm just by listening that the high frequency drivers are working properly. It’s also great for evaluating the sound coverage of the horn.
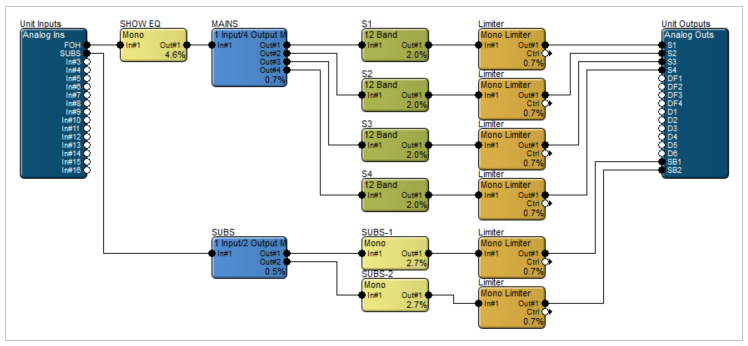
Next, turn down the amp channel driving S1, and turn up the amp channel driving S2, and go through the same listening test. Then continue the process, feeding that 6 kHz pink noise audio signal to each of your main loudspeakers one at a time. (If you have access to the DSP, you can instead turn those outputs on/off in the software and leave the power amps on.)

Your goal is to listen analytically and evaluate each loudspeaker one at a time.
It will be obvious if the HF driver is blown on any of your loudspeakers because you won’t hear any sound from them at all. At 6 kHz, we’re well above the crossover point so nothing will be coming from the woofers. Let’s say that you can hear the signal from each of those loudspeakers. Do they all sound roughly the same at that high frequency pink noise?
If not, make a note to have any loudspeakers that aren’t sounding right so you can take a closer look. They may be fine, but it’s worth digging deeper. Next, follow the same evaluation process one loudspeaker at a time using the full range pink noise WAV file. In this case we are evaluating the low frequency drivers of the loudspeakers as well as the high frequencies.
Next, play some speech over the loudspeakers (like a recording of your teaching pastor), and some music that you are familiar with, and listen carefully. Do they sound “good”? Here again, evaluate each loudspeaker one at a time. Later you can listen to the entire system, but first make sure that each loudspeaker sounds "right" by itself.
Do you hear any mechanical buzzes or rattles? If so, are those noises coming from the one of the woofers, or the loudspeaker enclosure, or the rigging, or is it just the building itself?
Check the Subwoofers Too!
If you have a subwoofer as part of the system, evaluate that as well with the full range pink noise WAV file. Turn off the main loudspeakers and only turn on the subwoofers – one at a time.
For extra fun, I’ve provided recordings of some very low frequency sine waves. You haven’t had fun if you’ve never fed a 50 Hz sine wave to a subwoofer and cranked it up in a room. Buzzes in the subwoofer will immediately become apparent, as will any loose air vents or building steel.
Use restraint though. Don’t turn it up so loud that the subwoofer cone “bottoms out”, or you may tear the cone and blow the woofer.
Yes, this is kind of a tedious process. But it does ensure that you’re keeping watch over your loudspeaker system, and don’t get any surprises when several members of your congregation come to you saying that they’re having trouble understanding spoken word. The loudspeaker covering their seating area just might have a blown HF driver that you weren’t aware of. I would go through those loudspeakers at least once a year, twice if you tend to push your system pretty loud.
If you want to dig deeper into understanding your system, you can always use a simple RTA. There are many options available for smartphones.
For quick tests, I use the convenient AudioTools app from Studio Six Digital.
If you have the budget, you could invest in more complex software like SysTune or Smaart.
But unless you’re needing to test stuff professionally, a simple RTA is all you need. Some are free, while others cost a few dollars. Apps are available both for iOS and Android.
The folks at Electronic Arts have a cool smartphone app called NoiSee.
The same company also created the sound level smartphone app for NIOSH. (No RTA with that app.)
Copyright Curt Taipale, LLC. All Rights Reserved.

